Sunday, 20 January 2019

Thinking of warmer weather

Not sure what the weather is like for everyone else, but ours is bitterly cold and snowy. So I decided to stay warm in my craft room and think of spring! I seen another card with the new Butterfly Friendship stamped on black cardstock and thought it would be perfect!

I randomly stamped one of the butterflies in white ink on a 3 3/4 x 5 pieces of black cardstock. I made three and coloured each one differently. The first one I used oranges, yellow  and red pencils and black glitter gel pen.


The next one I coloured with blue pencils and used a silver metallic gel pen. The results are amazing .


The last one I decided to use all gel pens. I used pink, purple, peach and black glitter gel pens. The look on this one I more modern or abstract, but I like the look. It’s a little different for me but I’m always trying something new. 


Saturday, 19 January 2019

Love is in the Air!

I’ve always loved to decorate for different times of the year,  but Valentines was never one I’ve done before. So I thought why not, new crafty room, New Year, new adventurer, so why not! For  this banner I’ve used my favourite - foam core board! Light weight and can be cut into endless shapes. I used my wood burning kit that has a little knife that heats up to cut my board.


Once I cut them all out I sanded each one with sand paper and an nail file.
I cut out 7”  triangle panel pieces on the cricut using the Art Philosophy cartridge and I cut an scalloped triangle to put in the back.  I cut 3 front pieces in Blush cardstock and 3 in a printed paper. The scalloped triangle I cut from Colonial White cardstock. I cut 1/8” strips of  Blush paper to cover the edges of each panel. I inked all the edges of the triangles with Sugarplum ink and glued them to the foam core board.


I then cut out rosettes from the Artise cartridge in the Blush and printed paper. I inked those edges in Sugarplum as well.  I cut roses from the Artise cartridge in 2” and 2 1/2”. I inked them in Sugarplum and then used the Blush Shimmer brush on the edges. I used dollies on 3 panels that I used both gold and clear shimmer brushes on the edge. I used a really wide sheer ribbon on the Blush panels.


I added a crochet ribbon and them Pom Pom ribbon on the top using hot glue.  I cut the letters out of gold glitter cardstock using the Art philosophy cartridge. I hot glued everything each panel as I wanted it to last but you could also use liquid glass. I used my pokey tool to put holes in the top
corner of each panel so I could use 2 pieces of sheer cream ribbon to tie each panel together. It was very difficult to get the holes in the crocheted ribbon, have to be very careful and make sure the hole is large enough without being to big. 


I’m so very happy with how this banner turned out. I think it will stay up way past Valentine’s Day. Thanks fir stopping by!


Monday, 14 January 2019

New Year, New Adventures!

Wows, it’s been a long, long time since I’ve used my blog. I really didn’t realize it has been so long. There’s been so many changes since my last post. I won’t go into everything but I will touch on the most important ones.

I started doing monthly crops  and 2 weekend retreats a year with my amazing friend Michele Burnard. She is a Creative Memories rep and we have lots of fun at the events and work very well together. We both sell amazing products and  it benefits us both. So don’t be afraid to try something new. It’s been an amazing adventure and I’m looking forward to more!

Last year I decided to also stop doing my home daycare full time and just do before and after school care. Been running the daycare for just over 15 years and needed a change. It’s wasn’t  an easy decision to make as I know it will take a while to get things up and running but I’m up to challenging myself. This  past fall my hubby helped me make over the toy room into my new craft room/ studio. It’s not a huge space but it has room for 4 people plus I can put 2 people in the kitchen at the island.
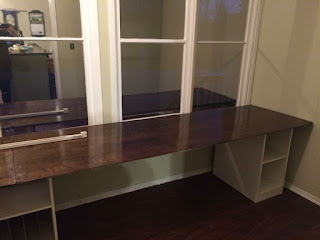
My hubby made me a 16’ desk with 3 storage shelves underneath and made shelves for the walls to hold ribbon and stamps. I still have my cricut, cartridges,big shot and dies and folders amongst other crafty supplies in my old room. I wanted everything I’m my new room, but I knew that wouldn’t be possible and I’m ok with that. I need to get up and move around instead of sitting around all day.

Here are the before, during and after pictures and a video of the new space. My hubby was a great help with my room from bulding and hanging crafty cupboards to putting up with me changing my mind. LOL.

I have acarmoire thst holds my CTMH stamps along with card stock, gems and so many other things. I have lots of space for ribbon, colouring supplies, paper and lots of embellishments. This room gets lots of natural light and the view isn’t to bad, it could be worse.

Well that’s all for today, I have a 16th Birthday Day card to finish for my youngest today. His birthday is today, nothing like leaving it to the last minute.

Thanks for visiting today!


Wednesday, 1 October 2014

Post it Note Holders

   Well first off I would like to say great work to all the ladies that where in the last blog hop and to say thanks to everyone who stopped  by for a look! I hope you all enjoyed the projects and will join us in the next one.

   Today I going to share with you the Post it note Holders that I made to give all the ladies who are coming to my retreat this weekend. They will also receiving one of the bat treat holders like the ones I posted yesterday filled with chocolate.


   I cut the base of the holder with the Artiste cricut cartridge at 3 1/2". I used retired paper from Lollydoodle,and Skylark. I scored a 1/4" space so that when I folded the paper, the edge lined up with Thanks. I just used some doubled sided tape hold the post it note in place and tied it shut with ribbon.
   I used a retired stamp called It's Your Day to make the \thanks on the front/. I stamped it once in one colour and than again in another colour and cut out the center of the one colour. The colours I| used are  Lagoon, Coca, Bubble Gum and Slate.
   These where very easy and simple to make and \I think the ladies will love them.

   Thanks for stopping by!
 

Tuesday, 30 September 2014

                          Welcome to the Hearts of the West team blog hop!!


If this is your first time joining us you will love it. It features Close to my hearts Consultants from all over Canada showing you their projects. The hearts of the west was founded by Nancy Klein.
This months challenge is Scaredy Cat paper pack, brought to you by the new Annual Inspirations, hand picked from Nancy Klein.
\
If you came from Justine Hovey - http://www.justinehovey.com/2014/09/hearts-of-west-blog-hop-scaredy-cat.html....  Then you're in the right place, this is a go around blog hop so you can start anywhere! Just in case, the full list will be at the bottom. So, as always, grab your coffee, tea, water, relax, and hop around the team with us.

For this month blog challenge I decided to make a Halloween recessed window card and a matching treat holder. Halloween is my favourite holiday next to Christmas!!


   The directions for the window card are posted on here in an older post if you are wondering how to make this card.
    Once I had the card base made I cut 4 panels at 51/8" x 3/4" to go on the front of the card base. For the center of the card, I just cut the haunted house out of the printed paper in the paper pack. I used the Artbooking cart make the spiderweb fame, which I cut at 10". I  then added some black glitter to the spiderweb, which is hard to see in my pictures. I also used the Artbooking cart to cut out the bats. I used 3D foam tape to pop up the bats and I also added some purple glitter to the bats. The flowers where made by using the Artiste Cart and the Thistle paper  cut at 3 1/4", 3" and 2 3/4". I inked the edges of the flowers with black ink and spritzed them with water and than rolled them up. I also added a little purple glitter to the center of each flower. The leaves where also cut using  the Artiste carts and I used my embossing tool to give them some shape.


    For the inside of the card I used the Frightfully Fun stamp set. I masked them by using a post it note so I could stack them on top of each other. I then used my water colour pencils to colour them in.


   I cut a piece of printed paper at 4" x 4" and added a  piece of 3" x 3" colonial white paper that I stamped the Happy Halloween in Thistle ink.  The stamp is a  retired one called Backdrop-Charmed. I inked the edges of the colonial white paper in Thistle ink.

   I then decided to make a bat treat holder to match. I cut the bat from the Artiste cart at 5 1/4" and cut a liner from the printed paper at 5'.  I inked the bat with white ink and then I ink the inside bat with black ink.


    I cut the bat liner on the folded edges before I glued it to the inside. I added a black hoop and hook to help keep the wings closed. 


 I stamped on the circle with black ink using a stamp from the Magic Potions set. I cut a 1 3/4" black circle to place in the middle. The ghost and the happy haunting is from the Frightfully Fun stamp set. I also added some flowers which I inked with white ink.


Your next stop is http://annasscraps.blogspot.ca/2014/09/october-hearts-of-west-team-blog-hop.html


Thanks for joining us this month and come back next month to see what crafty projects we can bring to you! Thank you for stopping by and please feel free to leave a comment.

Here is the complete list:

Nancy Klein's - http://nancyklein.blogspot.ca/2014/09/hearts-of-west-team-october-blog-hop.html
2. Chantal Pearson's - http://www.itsahoot.ca/2014/09/hwbh-october.html
3. Janet McCormick - http://worksofheart2011.blogspot.ca/2014/09/are-you-scaredy-cat.html
4. Donna Thomson-Digby - http://datsmystyledj.blogspot.ca/2014/09/october-6-x-6-calendar-layout.html
5. Justine Hovey - http://www.justinehovey.com/2014/09/hearts-of-west-blog-hop-scaredy-cat.html...
6. Jackie Vandaele - http://jackievandaele.blogspot.ca/2014/09/welcome-to-hearts-of-west-team-blog-hop.html
7. Anna Miller - http://annasscraps.blogspot.ca/2014/09/october-hearts-of-west-team-blog-hop.html
8. Linda Pekrul - http://blueskyscrapping.blogspot.ca/2014/09/october-hearts-of-west-blog-hop.html
9. Holly Young-Bowers - http://heartfeltmemories2.blogspot.ca/2014/09/october-hearts-of-west-blog-hop.html
10. Sonia Parent St Jean - http://www.scrappingsonia.blogspot.ca/2014/09/hearts-of-west-october-blog-hop.html
11. Chelsey Vorosmarty - http://www.personaltouchscrapbooking.com/2014/09/october-hearts-of-west-blog-hop.html
12. Julie Kerr - http://jewelspapergems.blogspot.ca/2014/09/hearts-of-west-team-blog-hop.html
13. Heather Myers - http://hlmyers.blogspot.ca/2014/09/hearts-of-west-october-blog-hop.html
14. Kerry Hammel - http://scrapbookfunbykerry.blogspot.ca/2014/09/october-hearts-of-west-team-blog-hop.html


Thanks for stopping by!!!


Tuesday, 5 August 2014

August Specials!

   Good morning! I hope that everyone enjoyed the long weekend!! I know I did. Its so nice to sit back a relax at my trailer and I even got some crafting time in.

   For the month of August CTMH has an awesome special. If you buy any of the Picture My life programs (pgs 146-149) you will receive you choice of our Memory Protectors (pg 185) for only $3. These are great way to use those photo's that you want to use but don't have the time or your a scrapbooker at heart  but just don't know where to start.


   Also for the month of August with every $50 you spend you can buy this cute SOTM for $3 or you can also buy it at the full price of $19.97. 


  If you are interested in any of these you can go to my OBA by clicking the link to the right of the page. Thanks!